If you’re new to tech, the process of building a wellness app can feel overwhelming. Where do you start? How do you ensure your vision translates into a functional, user-friendly tool? At noaur, we’re here to simplify the journey. Below is a friendly, step-by-step breakdown of how wellness apps come to life—no technical jargon, just clarity.
Why This Process Works for Wellness Brands
- No surprises: Clear phases keep you informed.
- User-first focus: Designs and features align with real wellness needs.
- Adaptability: Start small (MVP) and grow as your audience validates your app.
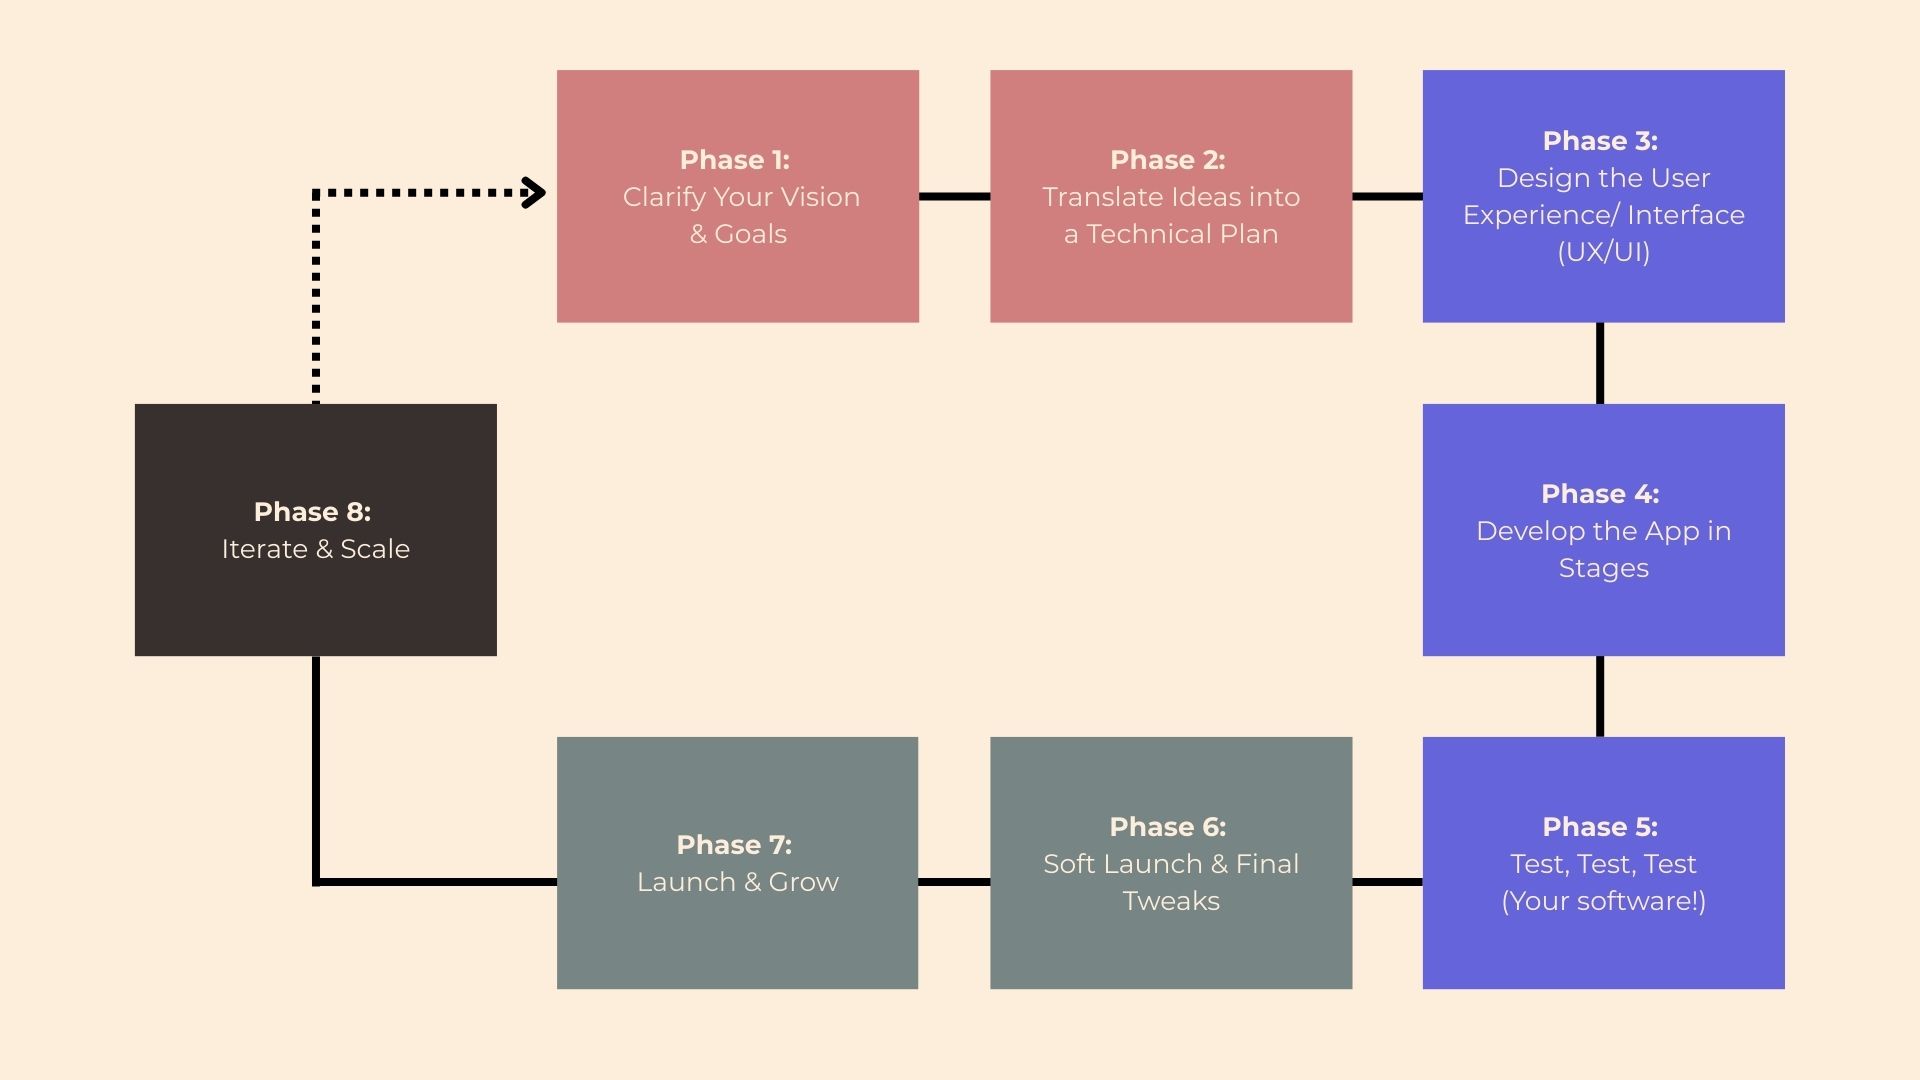
Phase 1: Clarify Your Vision & Goals
“What problem are we solving, and for whom?”
-
Identify the Core Need: Start by defining the wellness challenge your app addresses. Examples:
- Mental health: A meditation app for burnout in healthcare workers.
- Fitness: A postpartum recovery planner with personalized exercise plans.
-
Map Requirements: Answer key questions:
- Who needs access? (Users, coaches, admins?)
- Will the app handle payments, scheduling, or data tracking?
- Are there compliance needs (e.g., HIPAA for health data, GDPR for data protection, etc.)?
Why this matters: Clear goals prevent costly revisions later.
Phase 2: Translate Ideas into a Technical Plan
“How do we turn concepts into actionable steps?”
- Visualize Your Vision: Share sketches, competitor app screenshots, or even napkin drawings to explain your ideas.
- Collaborate with Developers: As a technical partner, noaur will:
- Define must-have features vs. “nice-to-haves.”
- Estimate timelines and costs (e.g., MVP vs. full build).
- Suggest budget-friendly adjustments (e.g., using pre-built calendars vs. custom tools).
Tip: Flexibility here ensures your budget stays on track.
Phase 3: Design the User Experience (UX) & Interface (UI)
“Will users love navigating the app?”
-
Wireframes & Prototypes: Designers create clickable mockups to map:
- User Flow: How users move seamlessly from sign-up to booking a session.
- Feature Placement: Where key elements (payment buttons, progress trackers) live for intuitive access.
- UI Visuals: Early concepts of color schemes, typography, and button styles that align with your brand (e.g., calming gradients for mindfulness, bold icons for fitness).
-
Feedback Rounds: Refine both UX and UI to ensure:
- Brand Consistency: Colors, fonts, and imagery match your vibe (e.g., earthy tones for holistic wellness, crisp layouts for clinical tools).
- Emotional Connection: UI elements like micro-animations (e.g., a soothing ripple effect when completing a meditation) enhance the experience.
- Accessibility: Contrast ratios for readability, button sizes for easy tapping, and alt text for.
Example: A yoga app might be built with your brand kit and simplify its booking flow after users find the original process confusing.
Phase 4: Develop the App in Stages
“How does coding actually work?”
-
Build Incrementally: Developers create the app in manageable phases, with check-in frequency tailored to your team’s workflow and the project’s scope. Reviews might occur weekly, bi-weekly, or even after a full feature version is complete. During check-ins, they:
- Demo progress (e.g., “Here’s the meal-logging feature in action”).
- Adjust priorities based on feedback or new requirements.
-
Key Focus Areas:
- Security (e.g., encrypting sensitive health data).
- Integrations (e.g., syncing with Apple Health, embedding Zoom for virtual sessions).
No tech expertise needed: Your role is to review outcomes and share clear feedback like, “This works” or “Let’s refine XYZ.”
Phase 5: Test, Test, Test
“Is the app reliable and easy to use?”
- Internal Testing: Developers fix bugs (e.g., a crash when uploading workout videos).
- User Testing: Share the app with a small group (clients, team members) to:
- Validate features (e.g., “Does the mood tracker feel intuitive?”).
- Catch overlooked issues (e.g., slow loading on older phones).
- How we share the app:
- iOS: Use TestFlight (Apple’s official beta testing tool) to distribute builds securely.
- Android: Leverage Google Play’s Internal Testing feature for smooth sharing with testers.
- How we share the app:
Wellness-specific tip: Test for accessibility (e.g., font size for older users, keyboard navigation, etc.).
Phase 6: Soft Launch & Final Tweaks
“Let’s start small to perfect the app.”
- Release the app to a limited audience (e.g., loyal customers or a pilot group).
- Gather feedback to make final adjustments:
- UI tweaks (e.g., brighter buttons for better visibility).
- Performance fixes (e.g., reducing app size for faster downloads).
Phase 7: Launch & Grow
“Time to share your solution with the world!”
- Go Live: Launch on app stores with keyword-rich titles (e.g., “Holistic Nutrition Planner”).
- Post-Launch Support: Agree on:
- Who handles bug fixes (usually your development partner).
- Plans for future updates (e.g., adding AI coaching after validating user demand).
Phase 8: Iterate & Scale
“How do we keep improving?”
- Monitor Feedback: Track reviews and user behavior (e.g., drop-offs at the payment screen).
- Add Features: Expand based on what users love. Examples:
- Community forums for peer support.
- Wearable integrations (Fitbit, Oura Ring).
You’re Not Alone in This Journey
Building an app is a partnership. At noaur, we guide wellness brands with:
- Transparent communication: Regular updates in plain language.
- Wellness industry expertise: We understand compliance, user behavior, and trends.
- Empathy: We ask, “How can this app truly improve lives?”
- Sustainability: We take the initiative to make the app accessible and long-term usability.
Ready to Take the First Step?
Let’s drop an email to hello@noaur.group to talk about your vision—no pressure, just a friendly conversation to map your path forward 💙